
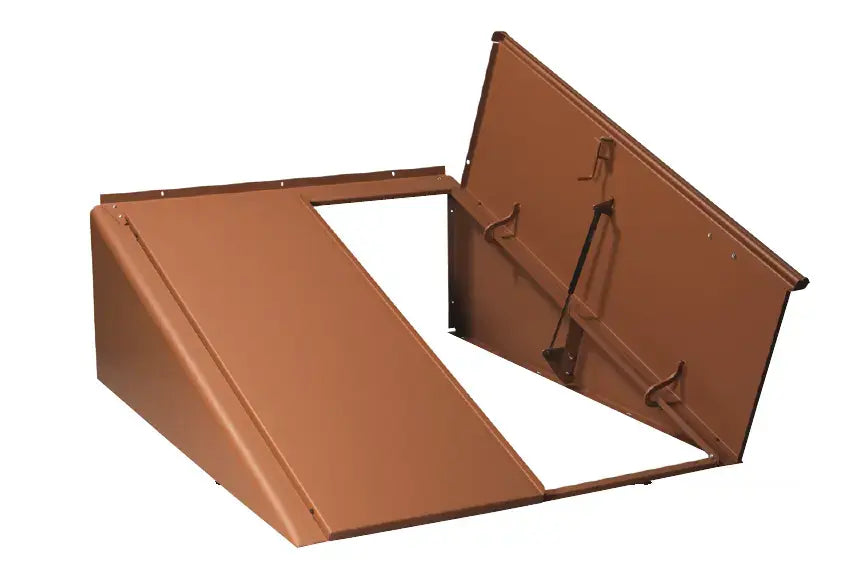
Classic Series
Steel doors for flat, level foundations. Sizes O, B, C and SL; primed and select powder-coated options.
Basement Door Installation Resource
Measure your opening correctly, compare BILCO door types and sizes, and follow instructions written for your exact door family.
Start Here
The correct door depends first on the shape and condition of your foundation. These systems are not interchangeable.
Steel doors for flat, level foundations. Sizes O, B, C and SL; primed and select powder-coated options.
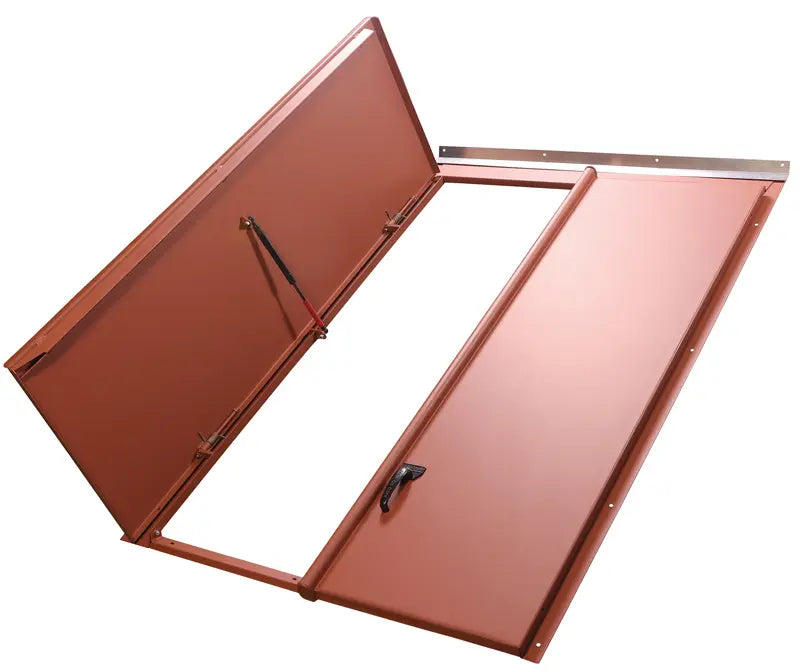
Steel doors for existing, structurally sound sloped masonry sidewalls. Models BR-1, BR-2 and BR-3.
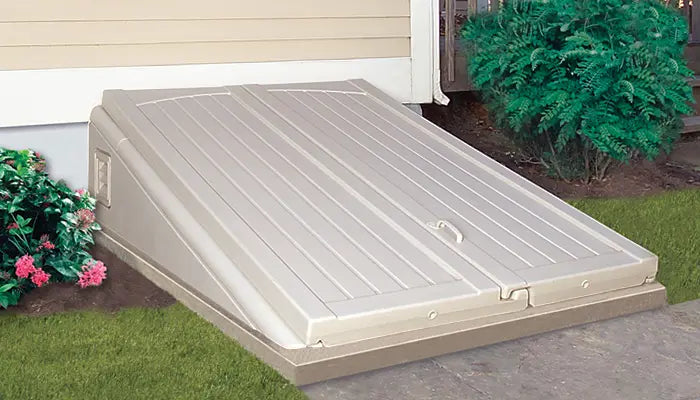
Corrosion-resistant polyethylene door for a flat foundation. Available in one Size C with its own instructions.
Most Important Step
Remove the old door and measure the exposed foundation in inches. Masonry may have been repaired, widened, capped or altered since the old door was installed.
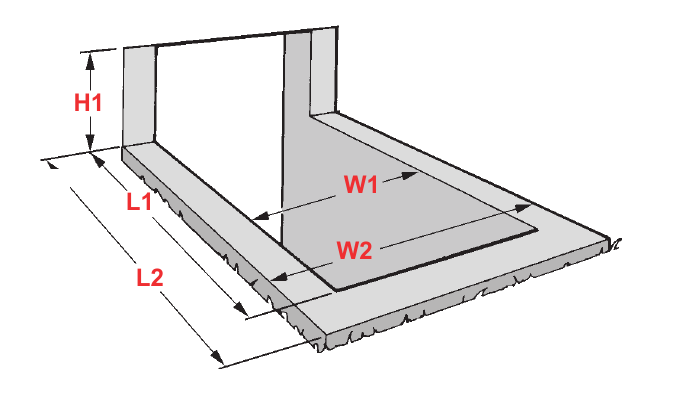
Flat-foundation measurements for Classic and Ultra doors.
Remove the old door, old frame and loose material. Measure the foundation—not the old frame.
Check near the house, in the middle and near the sill. Record the largest clear inside width the frame must cover.
Check more than one location and record the smallest usable outside width so the frame stays fully supported.
Measure both sides if the areaway is not square. Record the inside opening length and the full outside foundation length.
For a flat foundation, measure from the frame mounting surface to the top of the wall opening. Type BR selection uses the slope and width/length measurements instead.
| Door | Width | Length | Height | Extensions |
|---|---|---|---|---|
| Classic O | 47 in. | 58 in. | 30 in. | None |
| Classic B | 51 in. | 64 in. | 22 in. | None |
| Classic C | 55 in. | 72 in. | 19-1/2 in. | Classic C only |
| Classic SL | 51 in. | 43-1/4 in. | 52 in. | None |
| Ultra C | 56 in. | 73 in. | 19-1/2 in. | Ultra only |
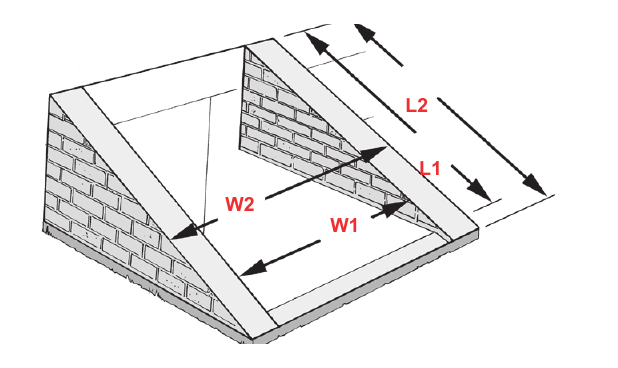
Example: W1 46, W2 52, L1 61, L2 66 and H1 20 inches fits Classic Size B: 51 inches wide, 64 inches long and 22 inches high.
Sloped Sidewalls
Use Type BR only on two structurally sound, flat sloped masonry walls that are level with each other, can hold anchors and allow the sill to sit 2–4 inches above grade.
| Model | Inside width | Overall width | Inside length | Overall length |
|---|---|---|---|---|
| BR-1 | 36 in. | 43-3/16 in. | 58 in. | 65-1/8 in. |
| BR-2 | 40 in. | 47-3/16 in. | 60-1/4 in. | 67-5/8 in. |
| BR-3 | 44 in. | 51-3/16 in. | 67-3/8 in. | 74-1/2 in. |
Send us W1, W2, L1, L2 and H1, plus: a straight-on house-wall photo; an overhead stairwell photo; both full sidewalls; the sill and surrounding grade; close-ups of damage or voids; and tape-measure photos of every critical dimension.
Contact Basement Supply Before OrderingModel Comparison
| Feature | Classic | Type BR | Ultra |
|---|---|---|---|
| Foundation | Flat, level | Sloped masonry | Flat, level |
| Material | Steel | Steel | Polyethylene |
| Sizes | O, B, C, SL | BR-1, BR-2, BR-3 | Size C only |
| Lift hardware | Gas springs; model hardware supplied | Gas springs plus adjustable coil springs | Motion dampers |
| Finishing | Primed or powder-coated | Primed or powder-coated | Do not paint |
Longer Openings
An extension adds length at the house end. It cannot correct a width, height or foundation-type problem.
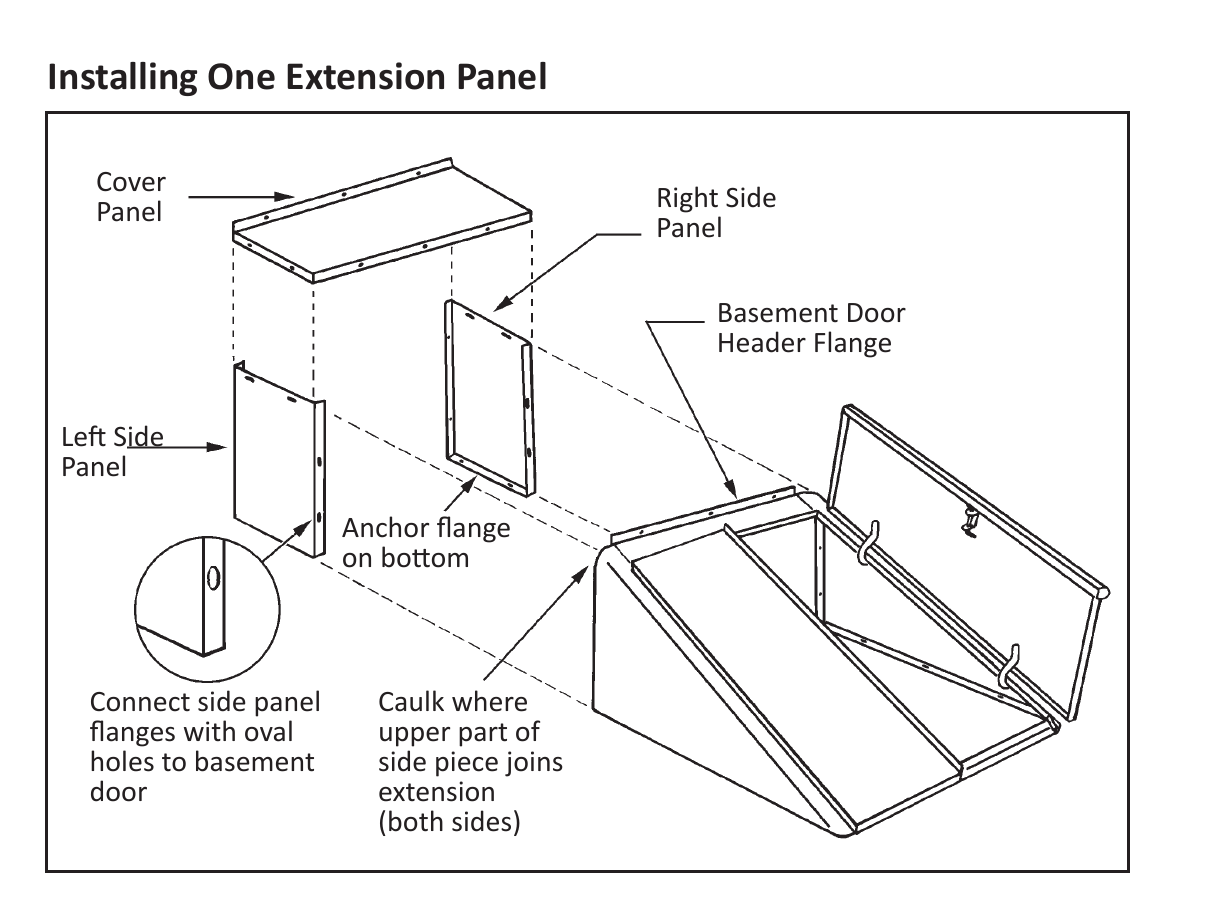
6, 12, 18, 24 and 30 inches. Total lengths: 78, 84, 90, 96 and 102 inches. Choose a total at least L1 + 2 but no longer than L2. Multiple extensions are supported only with BILCO’s documented support and weatherproofing.
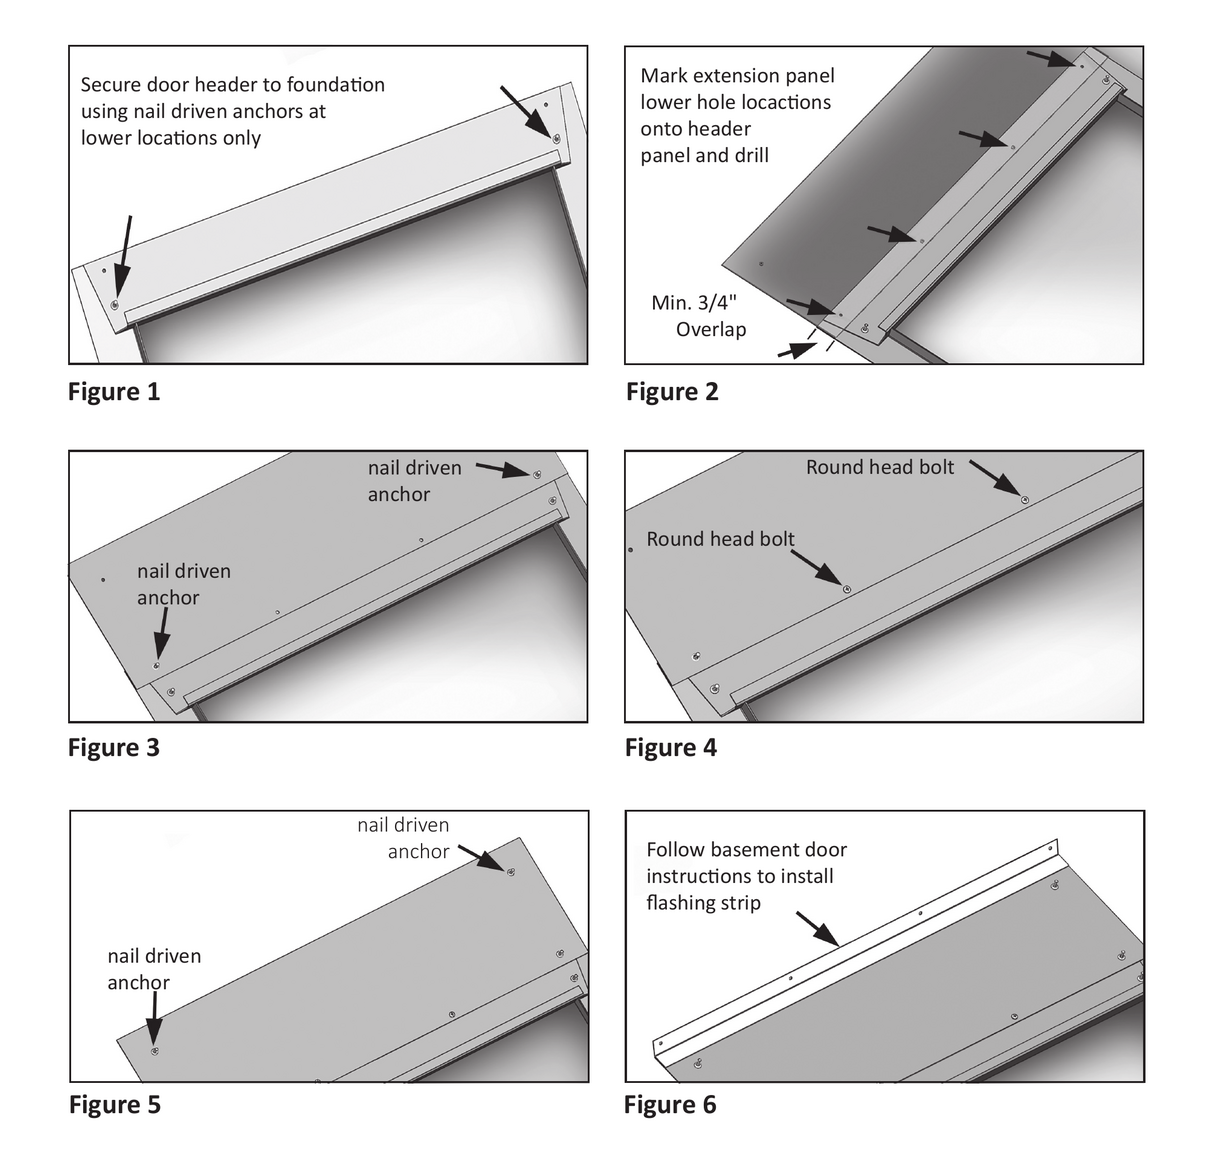
6, 12 and 18 inches, matched to BR-1, BR-2 or BR-3. The panel overlaps the header by at least 1 inch. Multiple panels may overlap; confirm support and flashing before ordering.
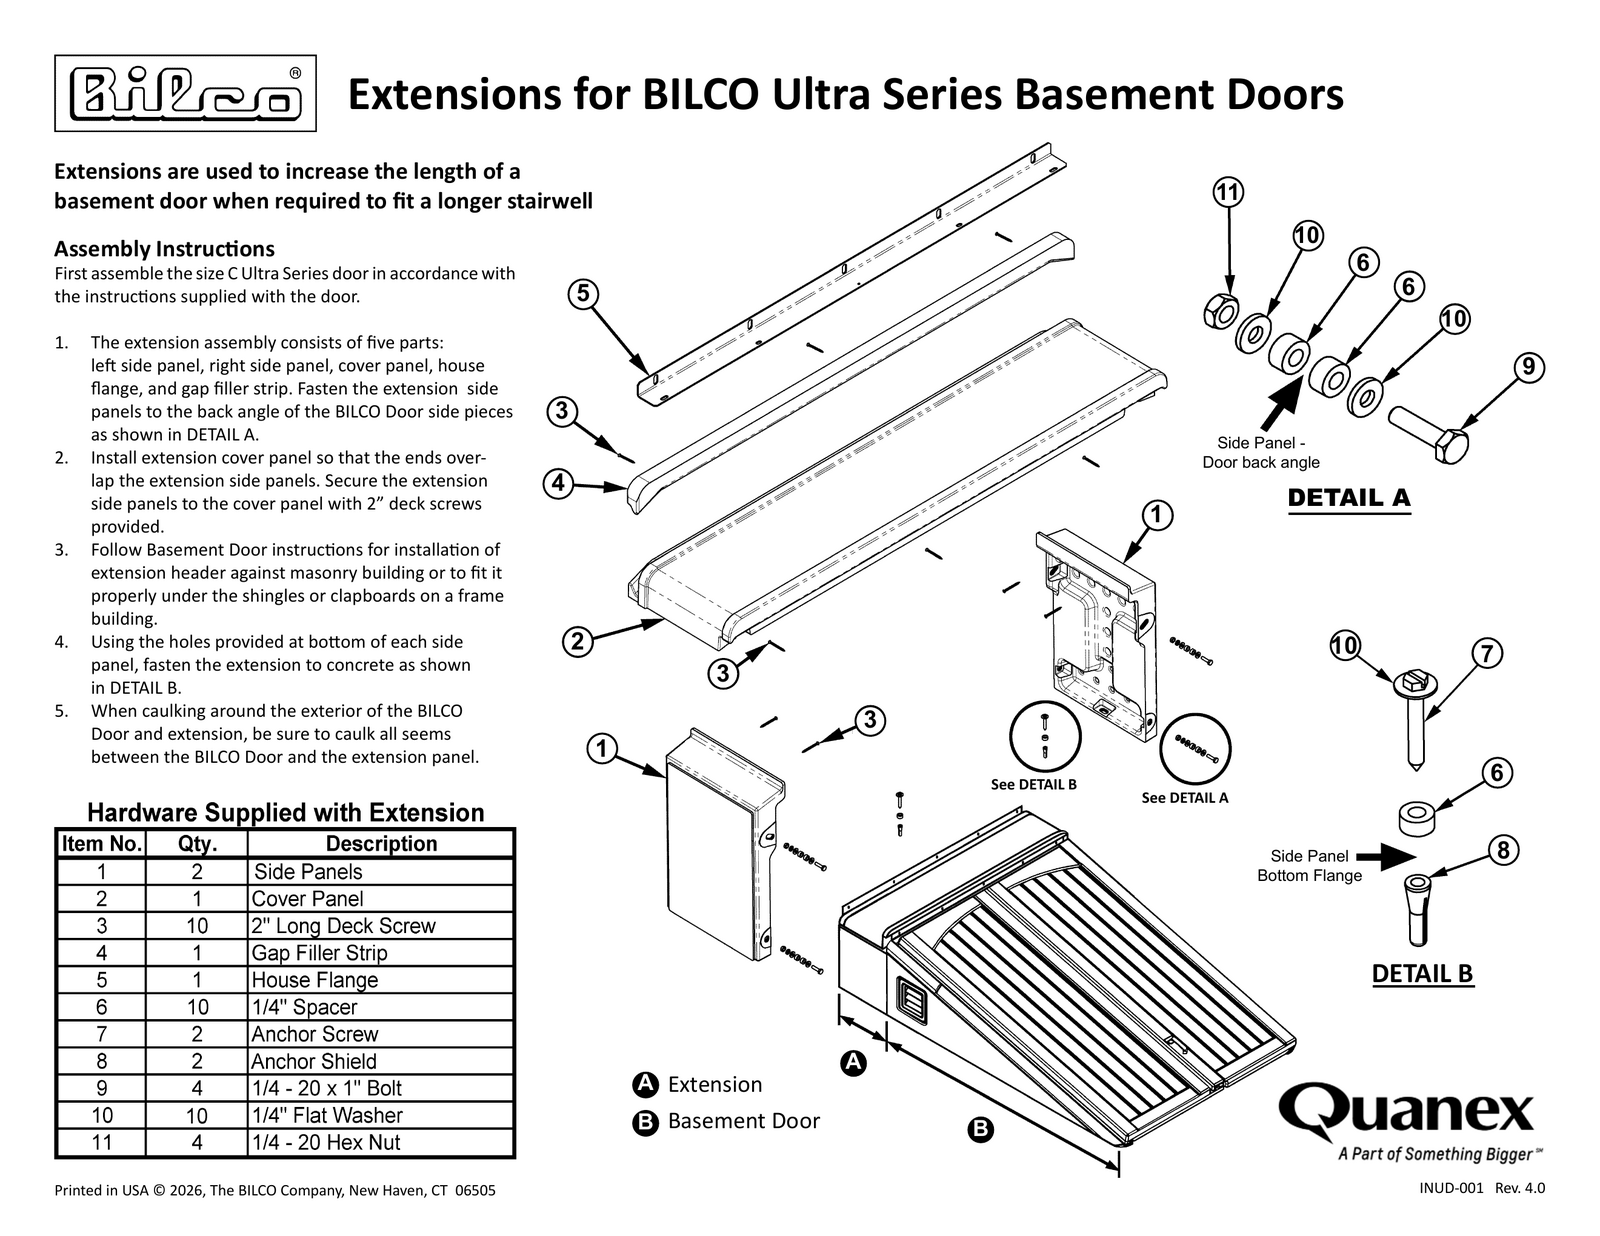
6- and 12-inch polyethylene extensions. Total length is 79 or 85 inches with one panel. BILCO permits no more than two Ultra extensions; confirm a two-panel layout before ordering.
Create a Suitable Mounting Surface
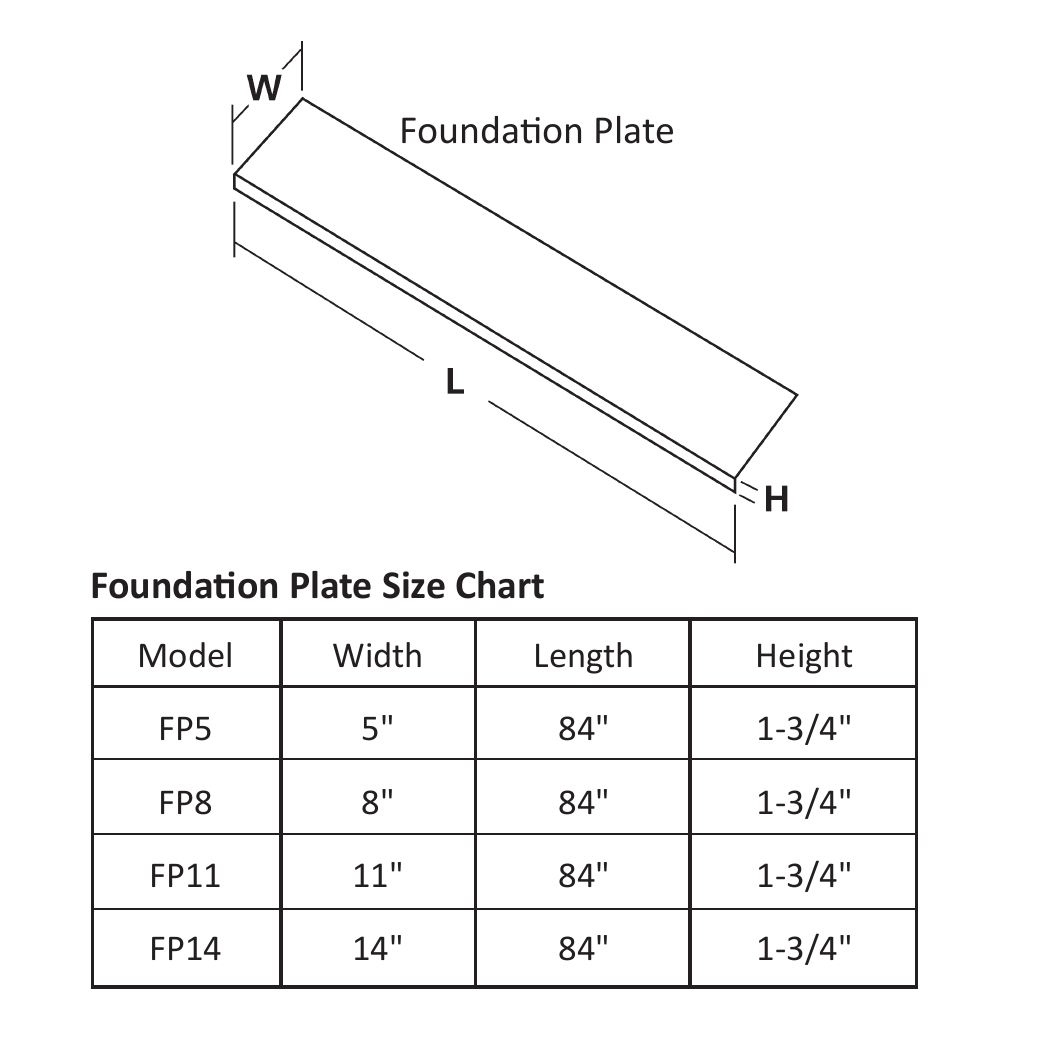
Foundation plates can cover rough masonry and minor voids, reduce an oversized inside width, and support certain corner installations. They do not make weak masonry strong.
| Model | Width | Length | Height |
|---|---|---|---|
| FP5 | 5 in. | 84 in. | 1-3/4 in. |
| FP8 | 8 in. | 84 in. | 1-3/4 in. |
| FP11 | 11 in. | 84 in. | 1-3/4 in. |
| FP14 | 14 in. | 84 in. | 1-3/4 in. |
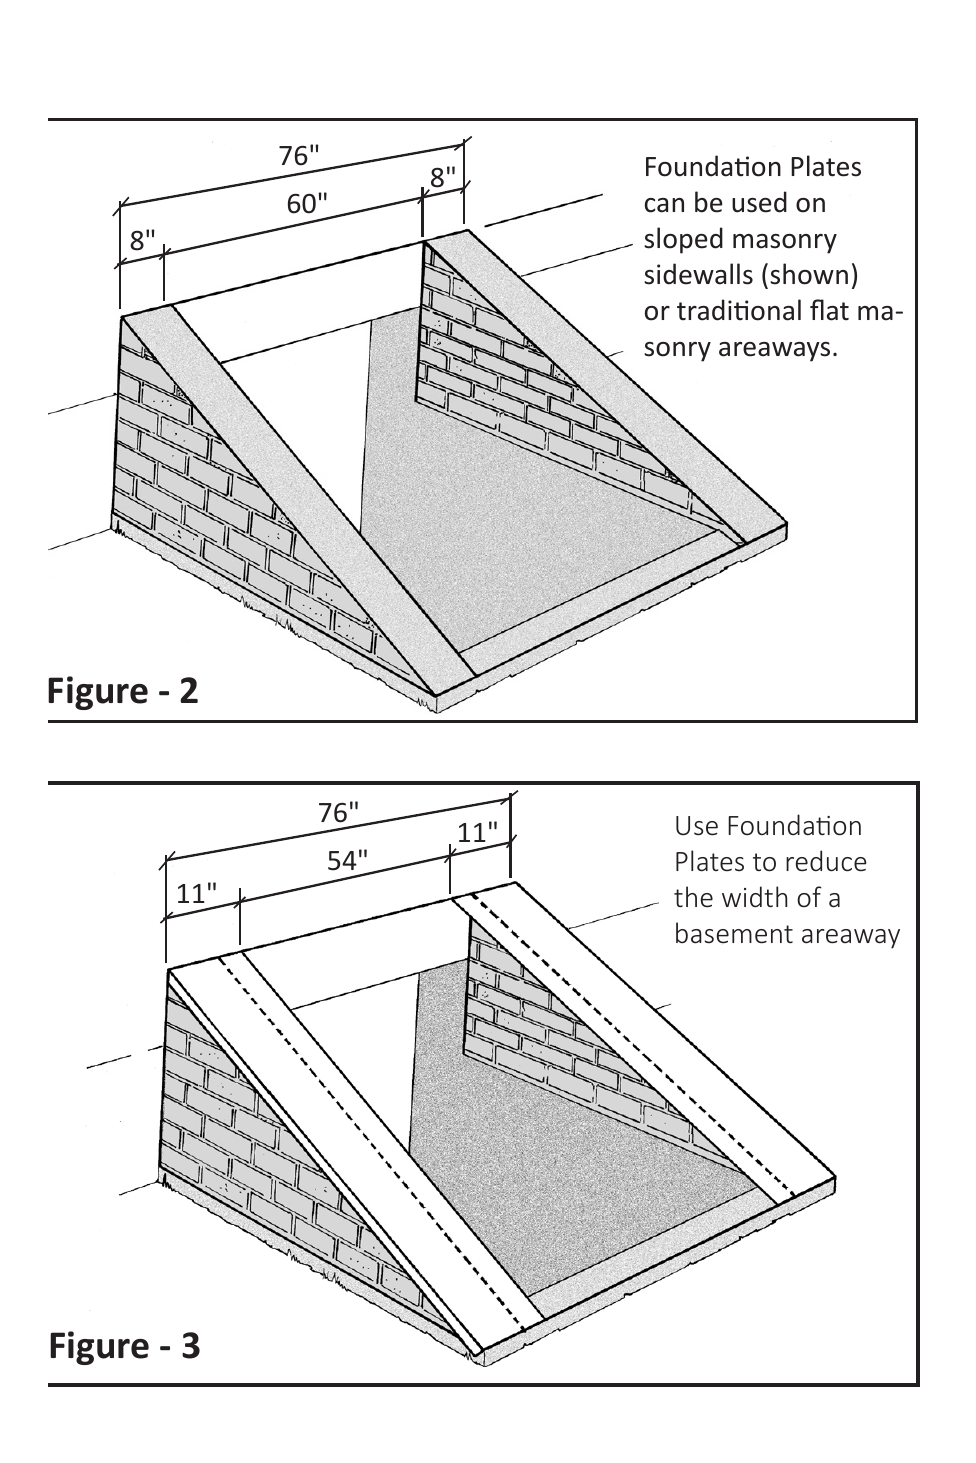
If overhang exceeds 6 inches, BILCO requires continuous support underneath. For areaways longer than 84 inches, follow the official sheet for overlapping a cut second plate.
Inspect, Plan, Protect
Flat Foundation — Steel
Use the manual packed with your door for every hardware count, drill size and anchor location.
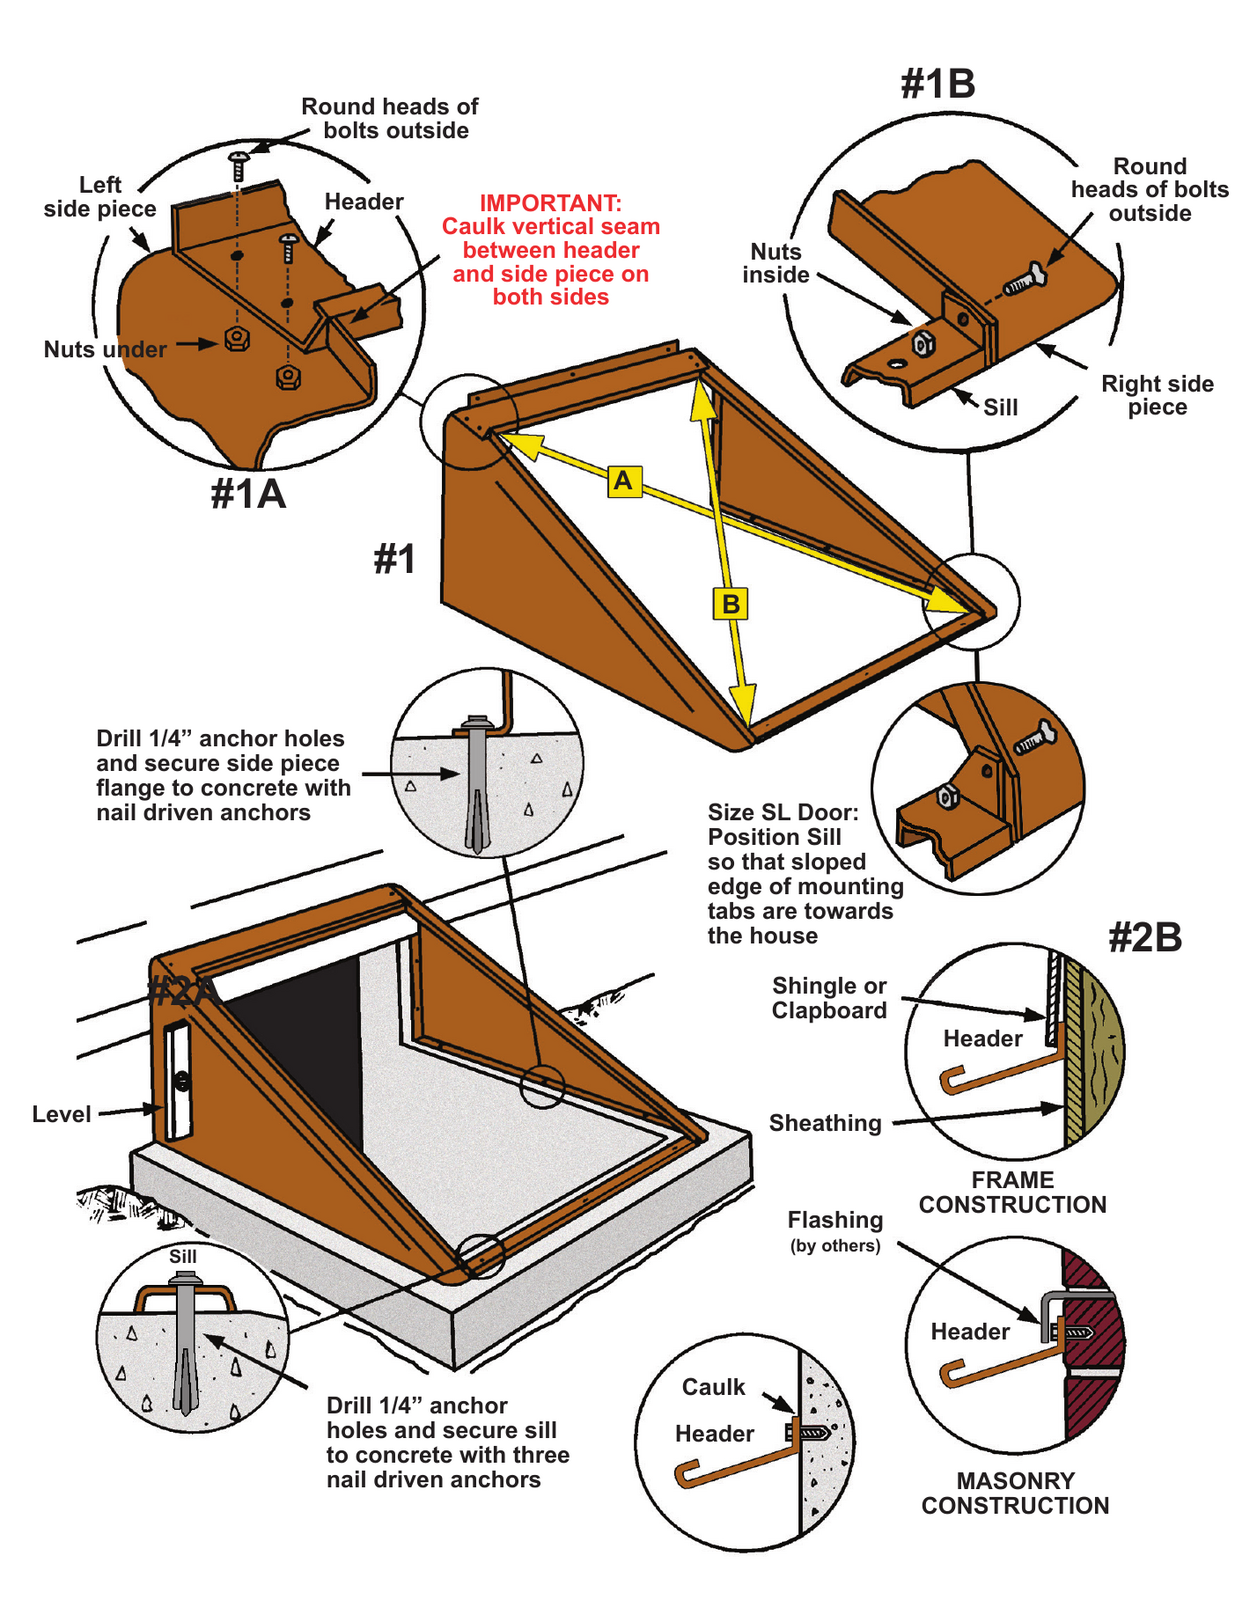
Remove the old door, patch holes and repair damaged masonry. Attach the header and sill to the side pieces with supplied bolts and caulk header seams. Size SL: orient the sill mounting tabs exactly as shown in the official detail.
Set the frame flush to the house, plumb both sides and make diagonal measurements equal. Mark and drill per the manual. Anchor the frame to masonry and use wall-appropriate fasteners for the house flanges. Caulk the exterior perimeter with opaque exterior polyurethane—never mortar.
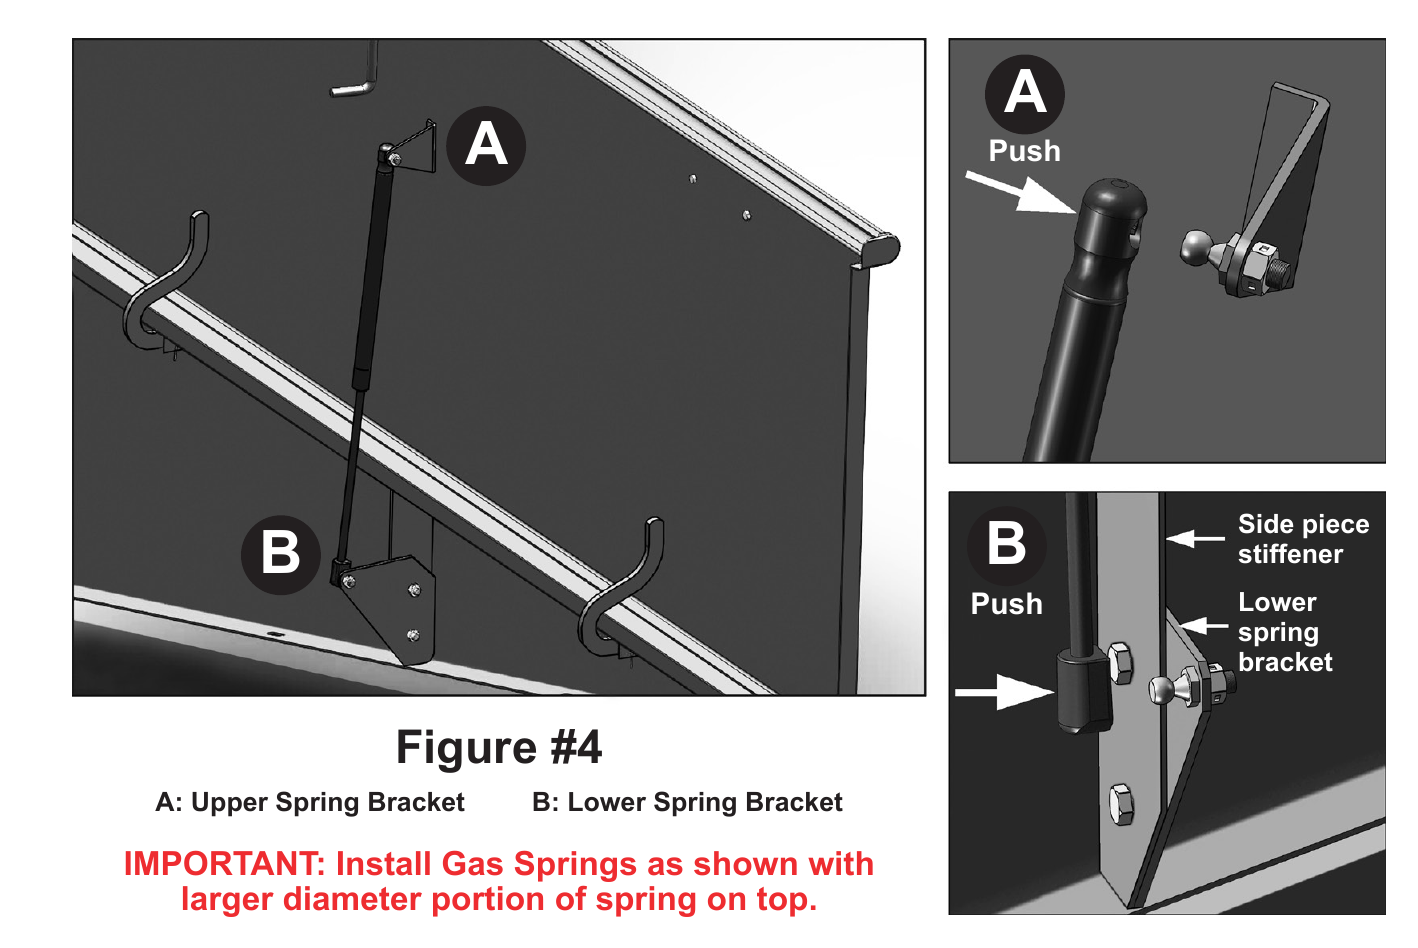
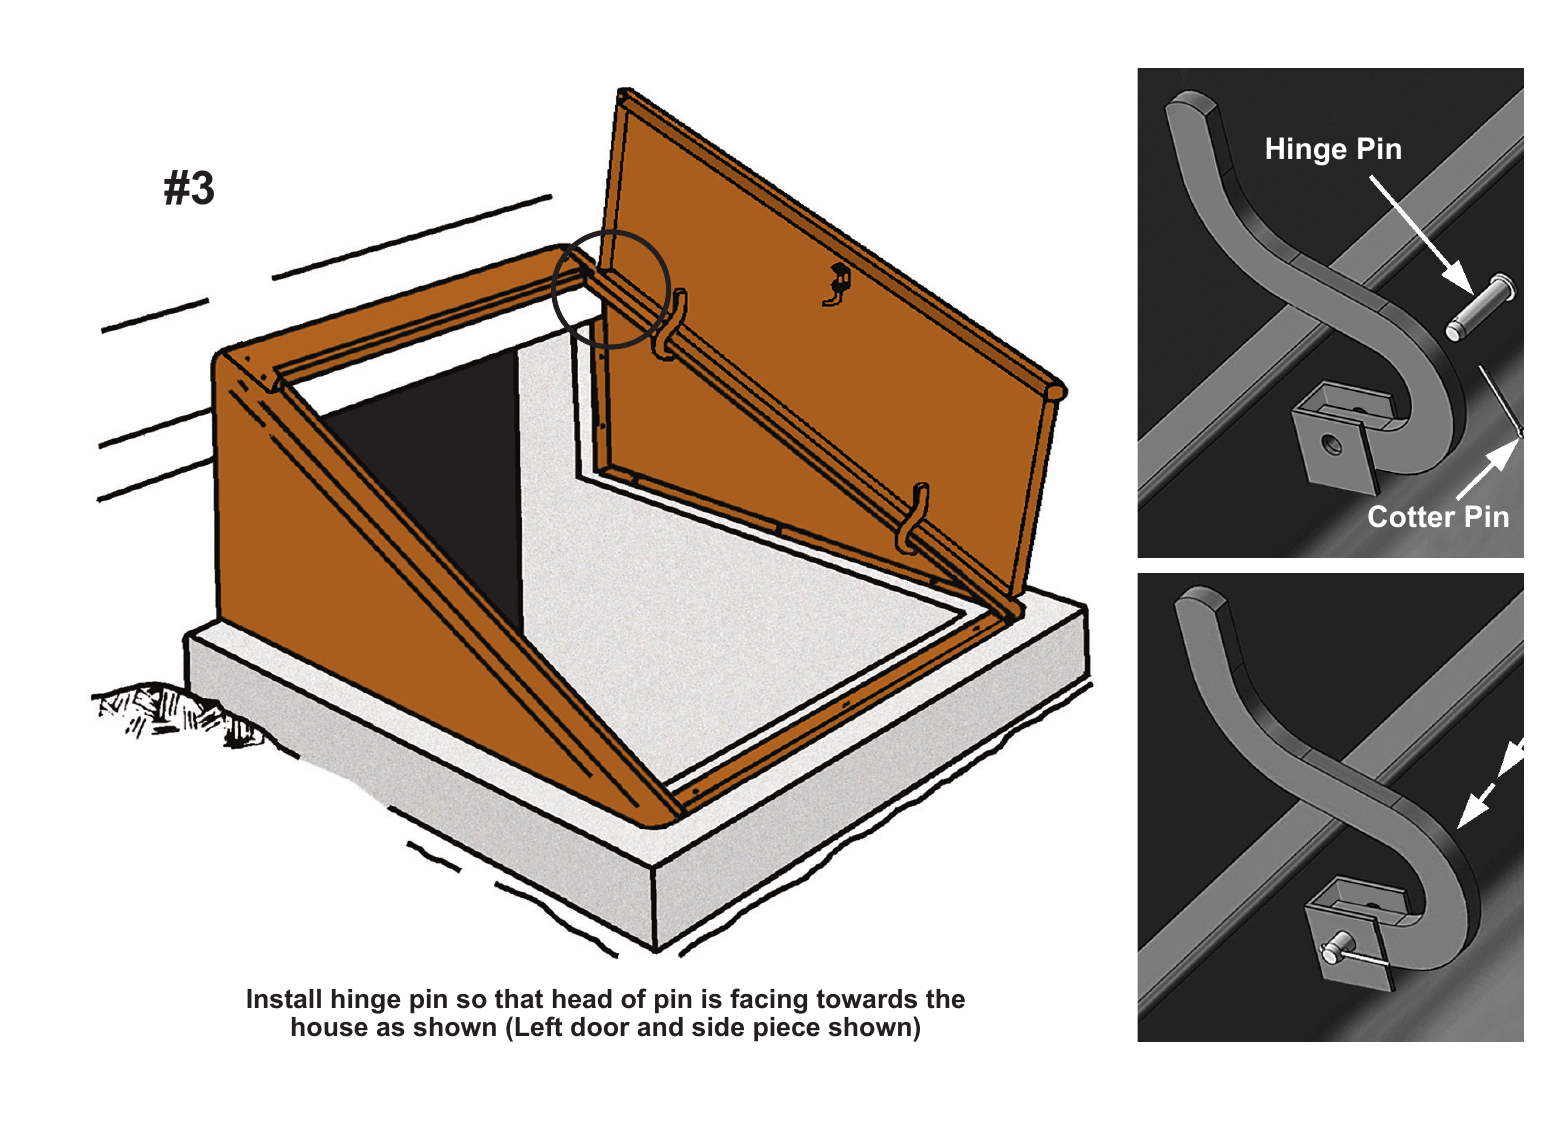
Use two people as needed. Install hinge and cotter pins, then attach lift hardware only after the frame is secure. On the current gas-spring arrangement, the larger-diameter portion is on top. Use the exact hardware supplied with your model.
Finish primed steel within 45 days; powder-coated doors need no added paint. Open and close slowly. Confirm smooth control, complete closure, secure fasteners, continuous caulk and clear header drainage.
Sloped Masonry Sidewalls — Steel
Type BR is not a Classic frame placed on a slope. Its frame, anchoring, lift assistance and flashing are different.
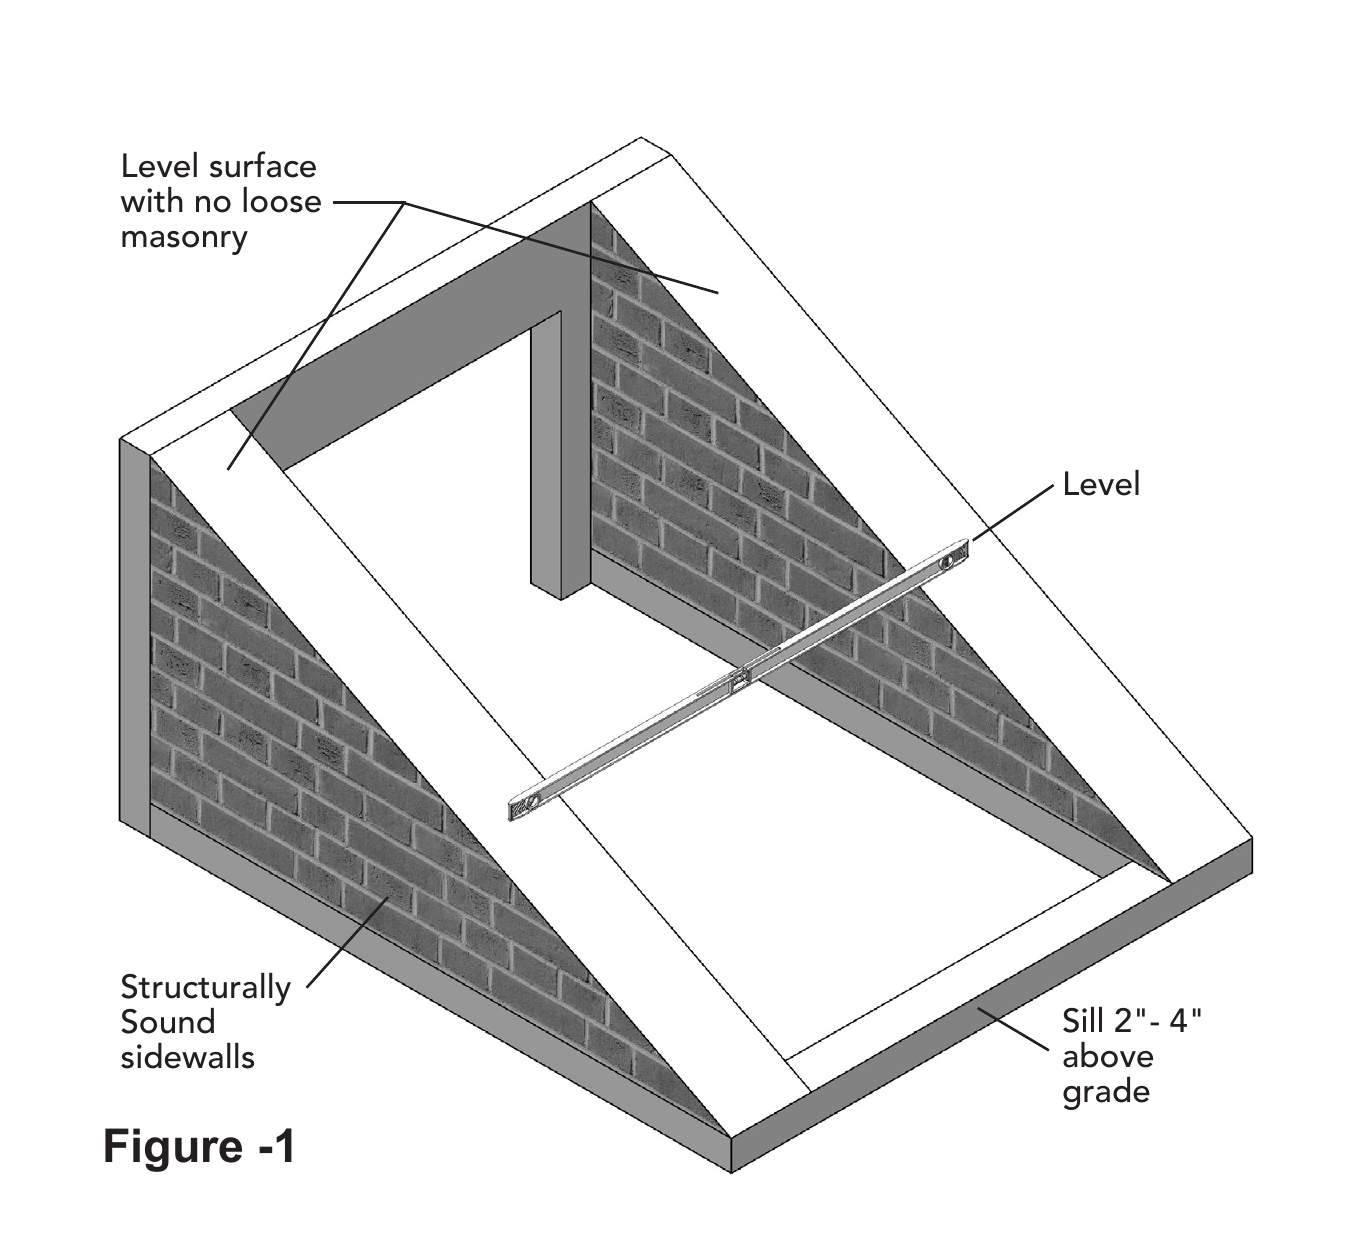
Both sloped sidewalls must be sound, flat, level and level with each other. The sill must sit 2–4 inches above grade. Repair or reinforce weak masonry first.
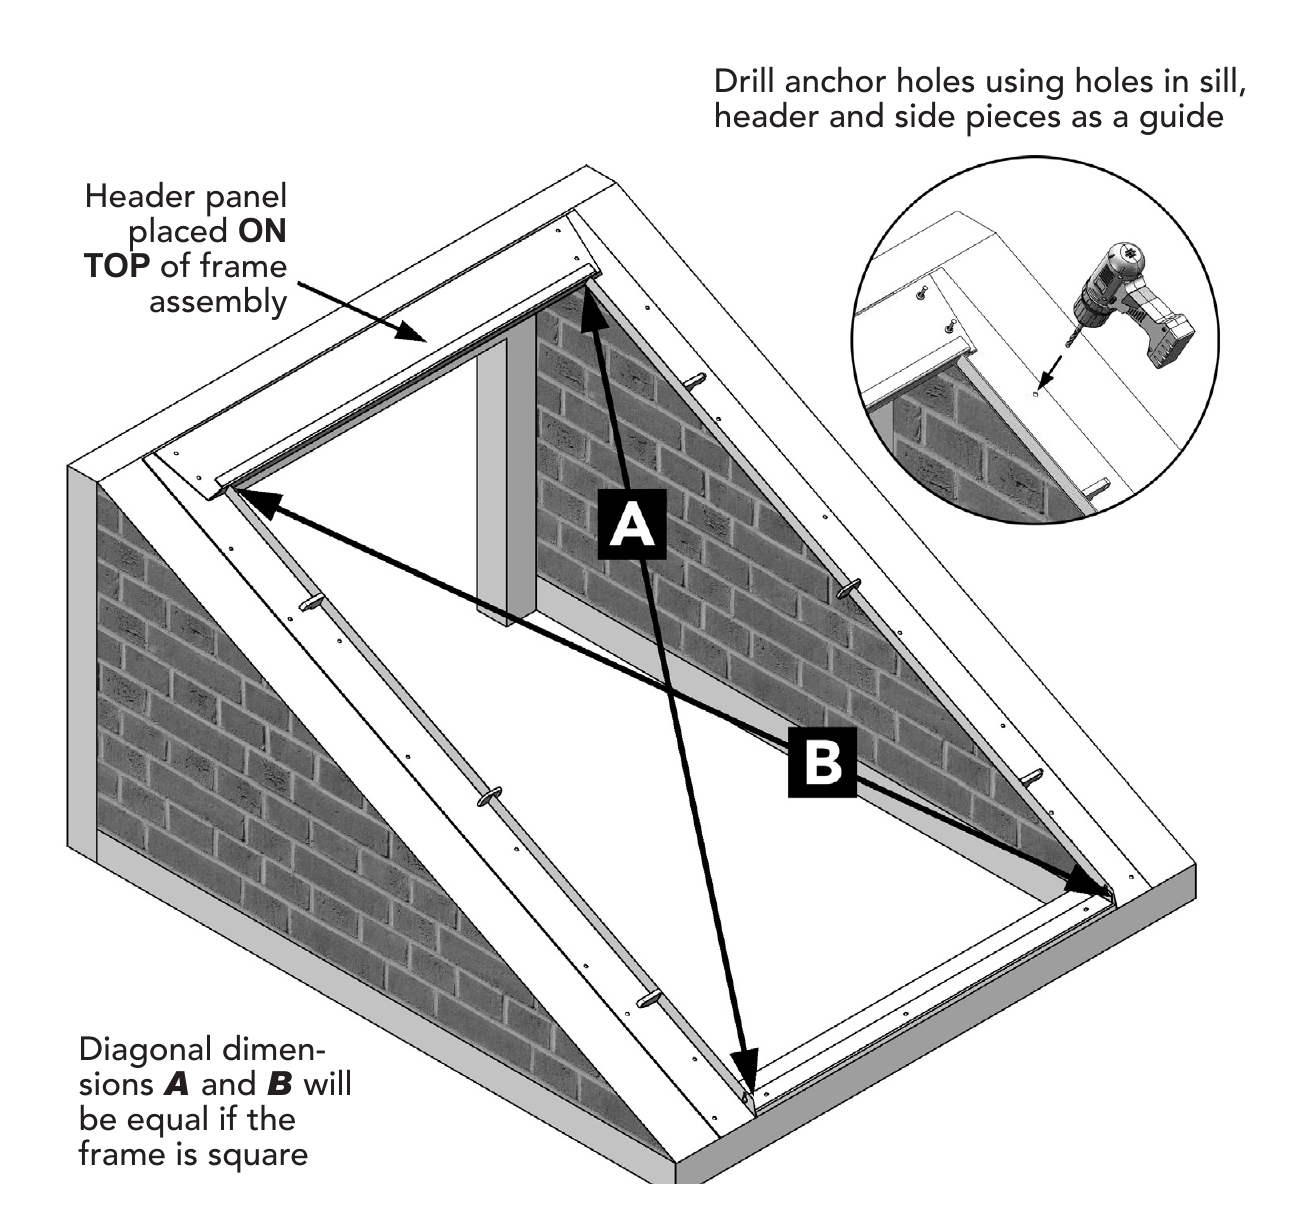
Attach the sill, set the supported side pieces and header, equalize both diagonals and tighten. Apply silicone beneath the frame on clean, dry masonry. Drill and install the supplied anchors exactly as specified; caulk anchor holes and header seams. Never bury the frame in concrete.
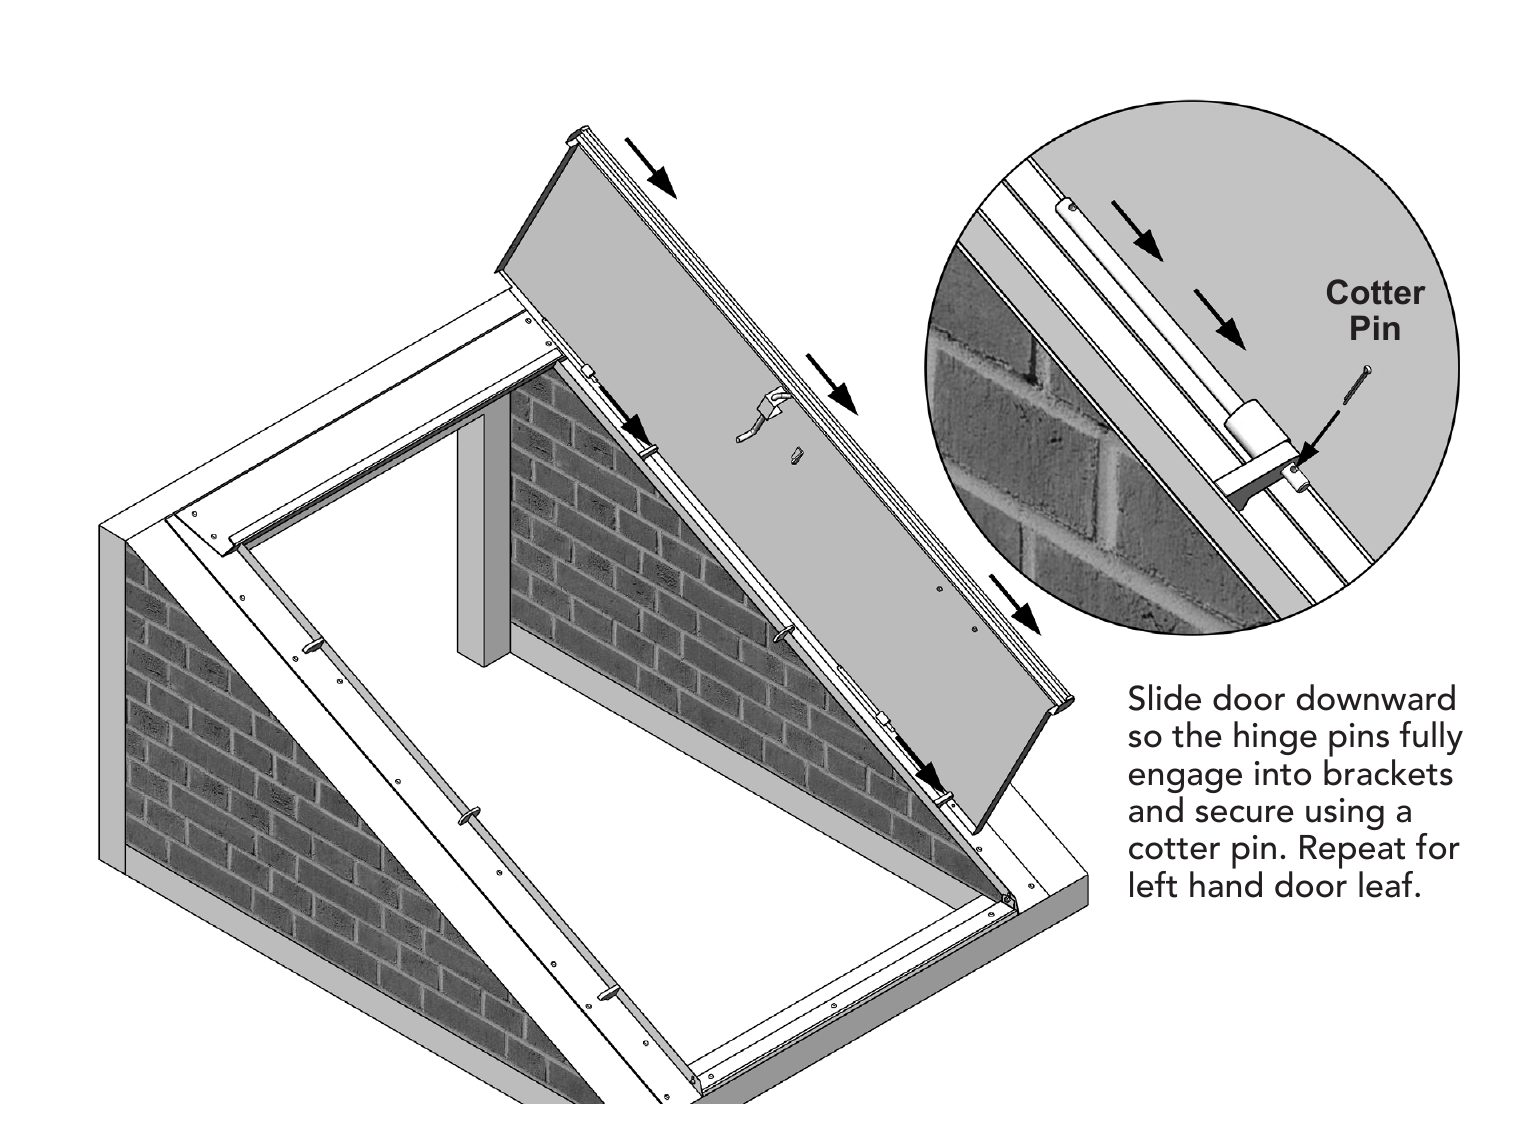
The leaves can slam before lift assistance is installed. Slide hinge pins fully into their brackets and secure them with cotter pins while controlling each leaf.
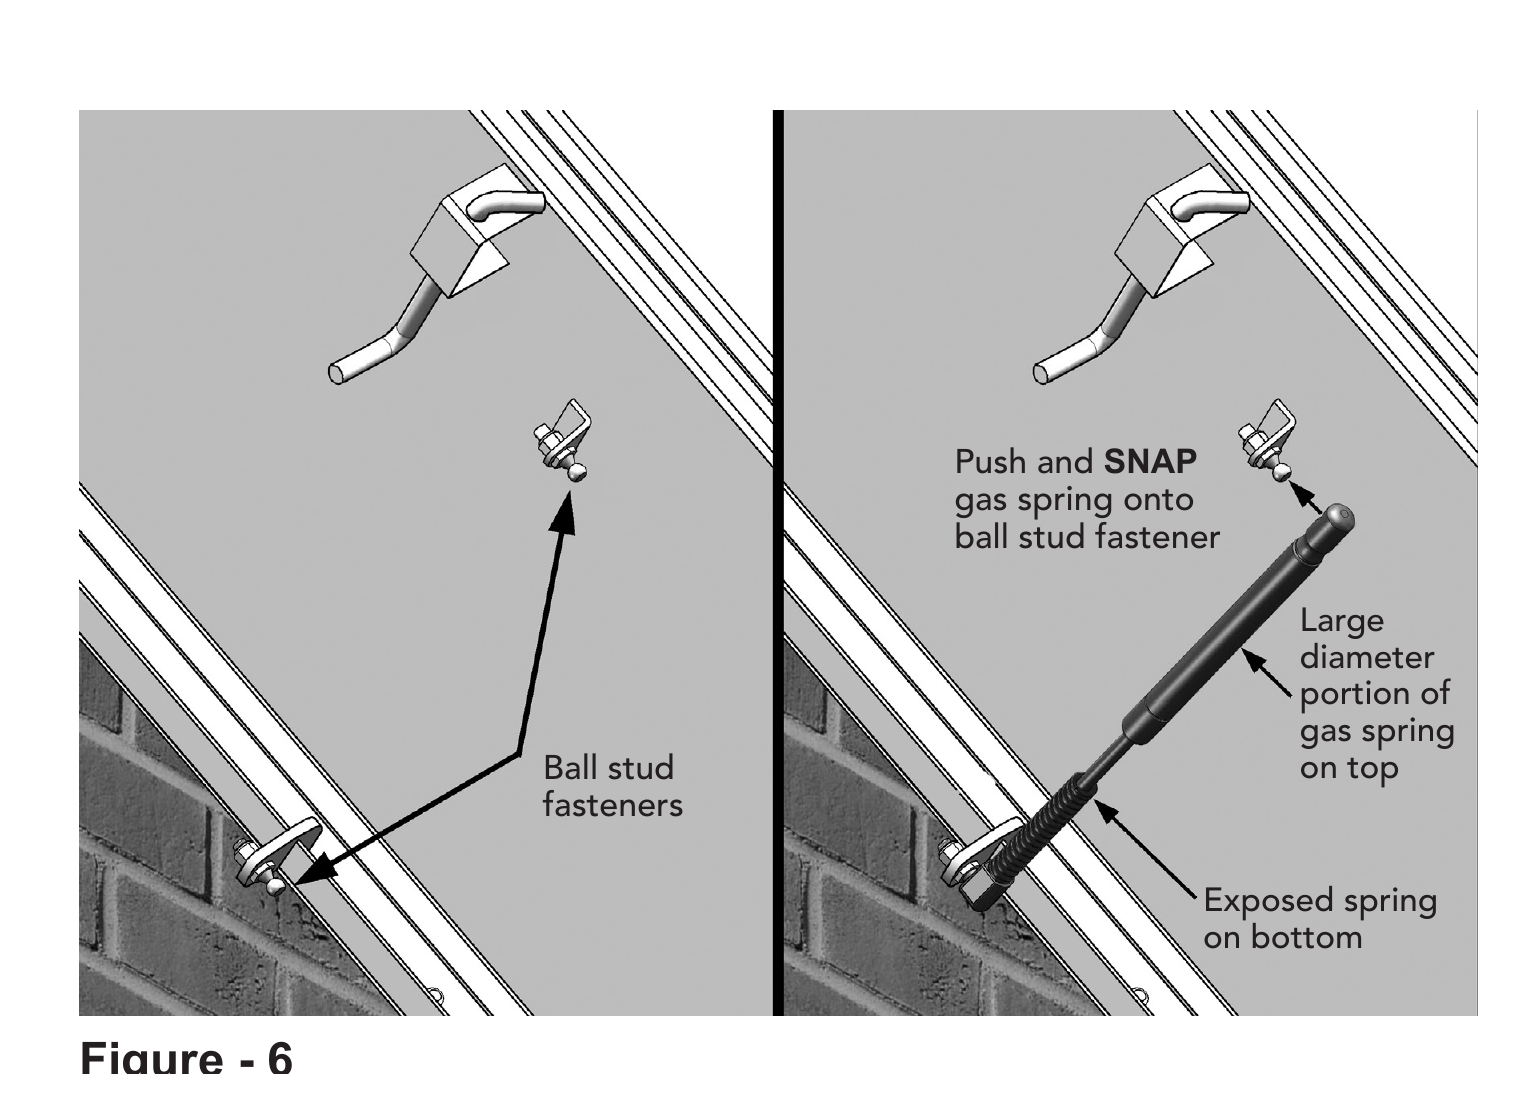
Follow the BR-specific orientation; the exposed spring portion is at the bottom on the current arrangement. Add the supplied supplemental coil springs as needed for controlled operation on the installed slope.
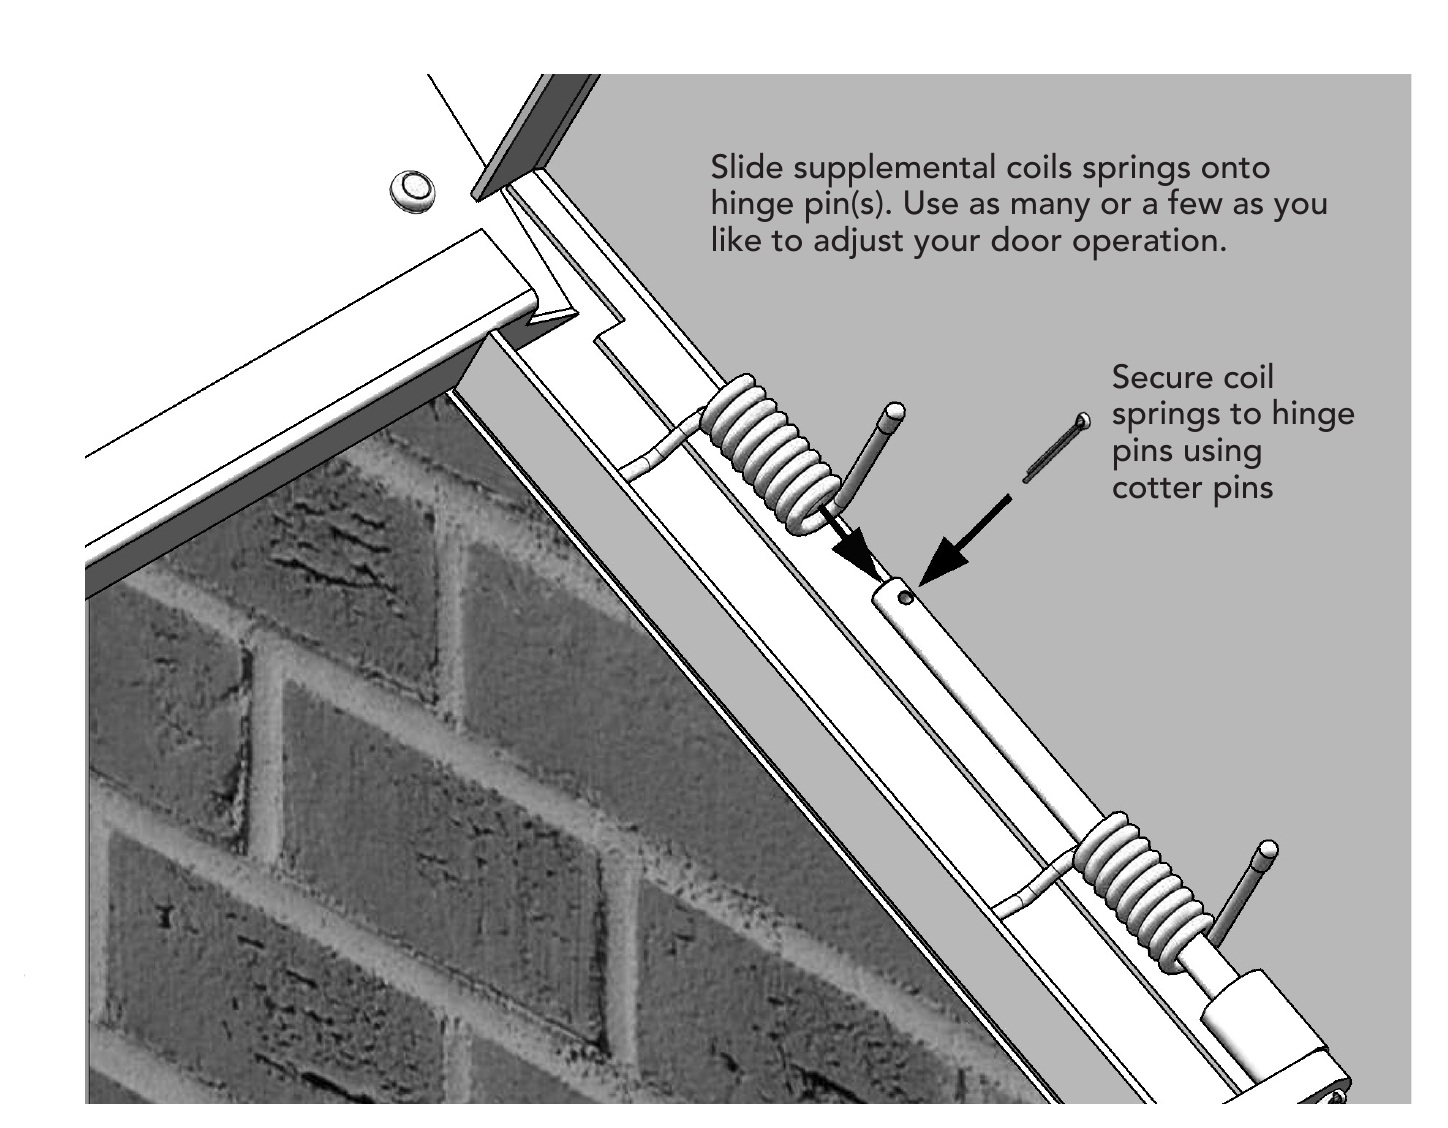
Use only the number and placement of coil springs needed for controlled operation on the installed slope. Test carefully and keep hands clear of moving parts.
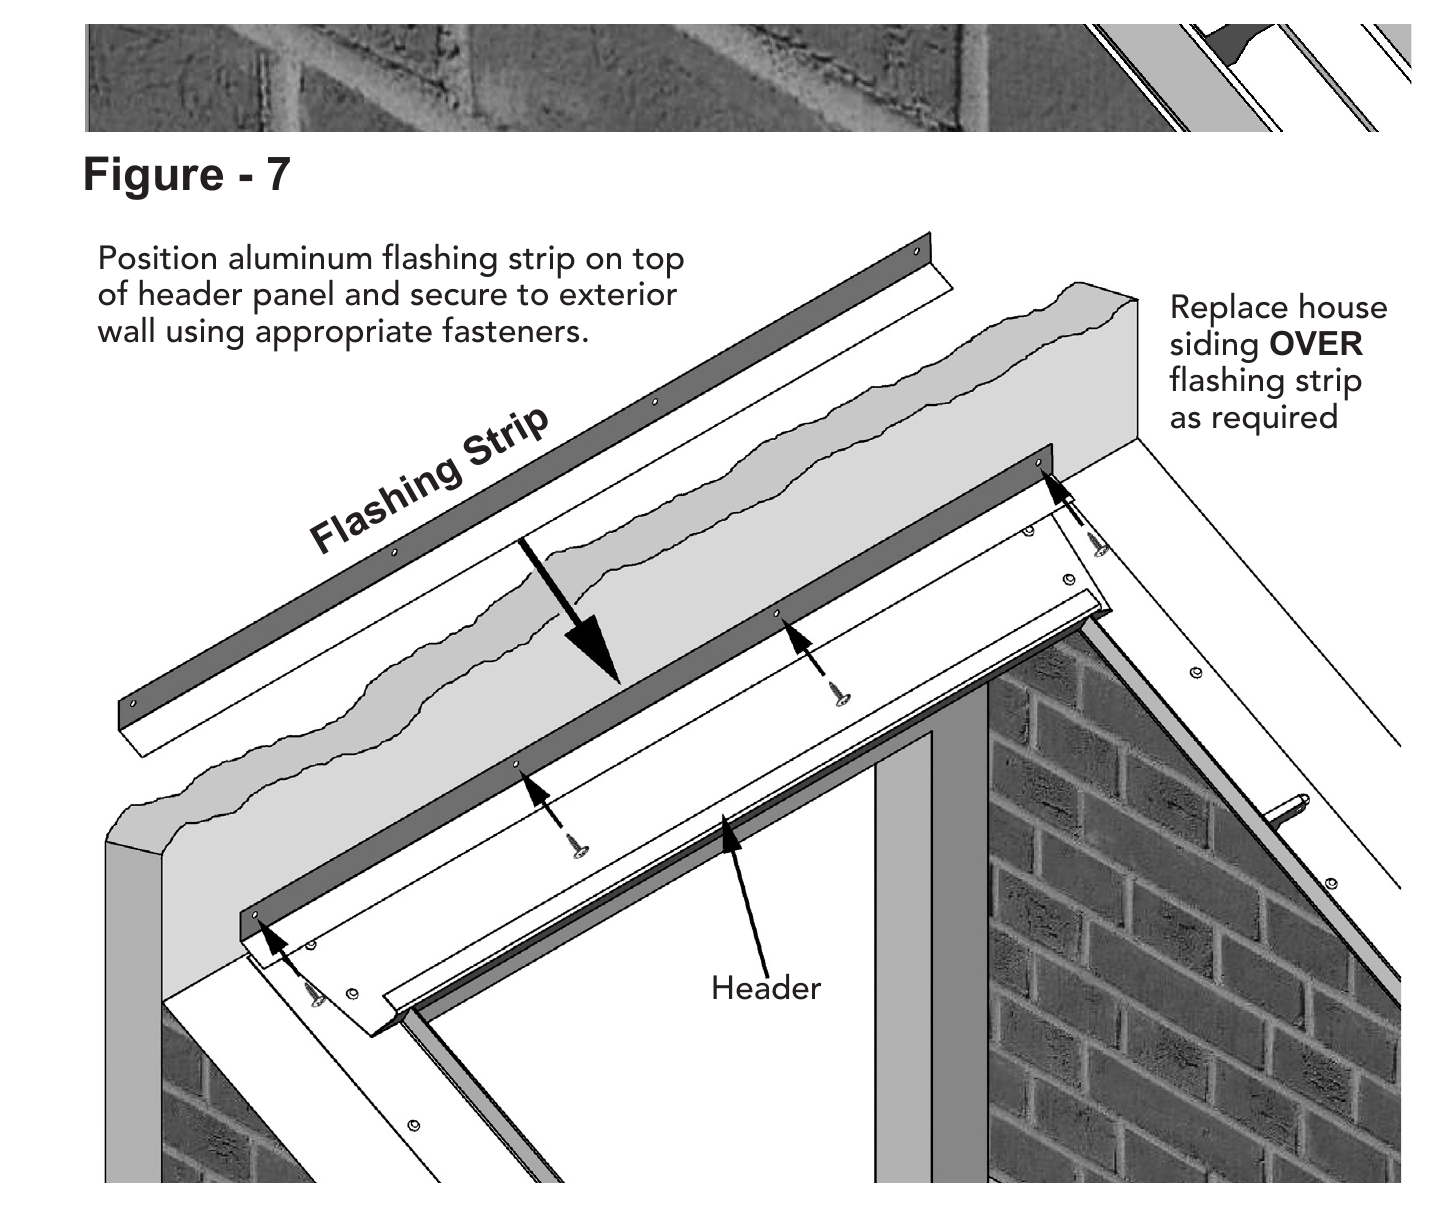
Finish primed steel within 45 days. Install the aluminum flashing at the house with appropriate wall fasteners; replace siding over it or seal its top edge on masonry. Confirm full closure, proper drainage and a clear header channel.
Flat Foundation — Polyethylene
Ultra uses its own polyethylene frame, anchors, hinges and motion dampers. Do not use Classic steel-door hardware or steps.
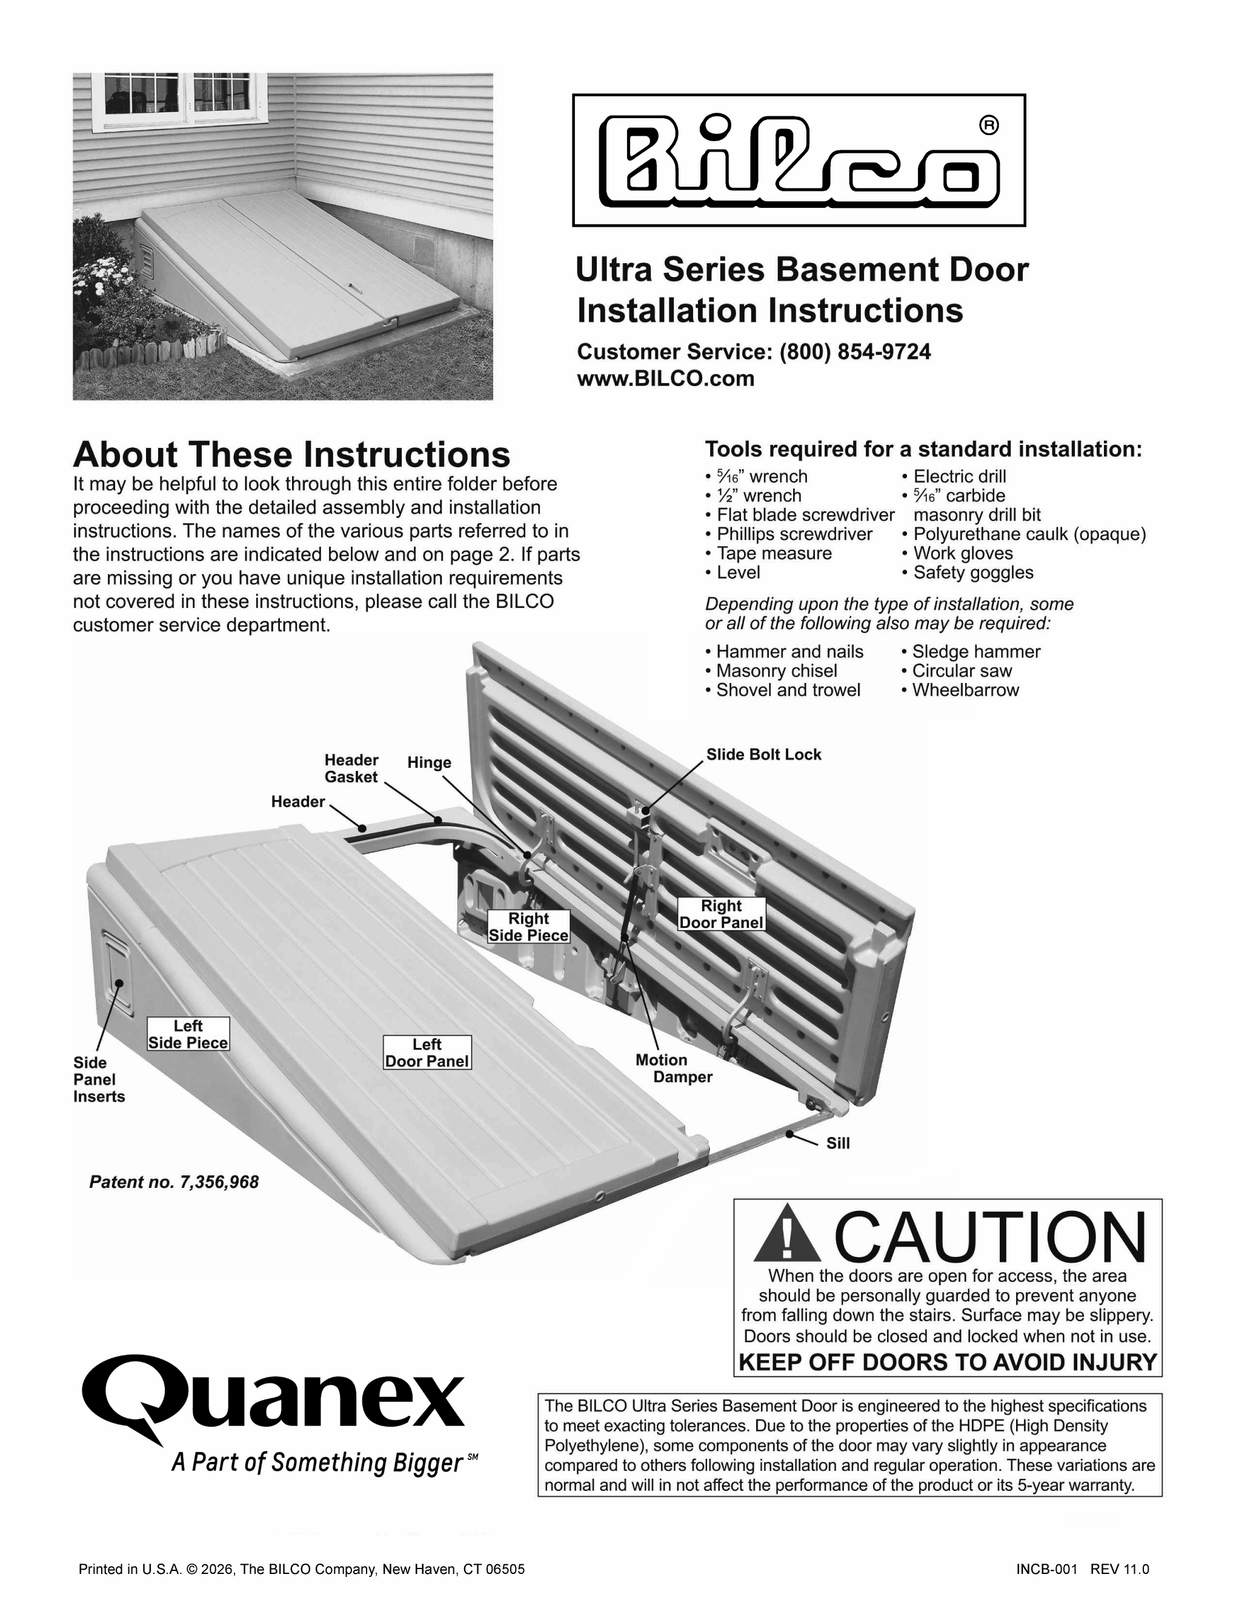
Confirm a smooth, level foundation. Connect the header and side panels with supplied drive screws, then connect the aluminum sill with the exact screws, nylon spacers and washers shown in the Ultra manual.
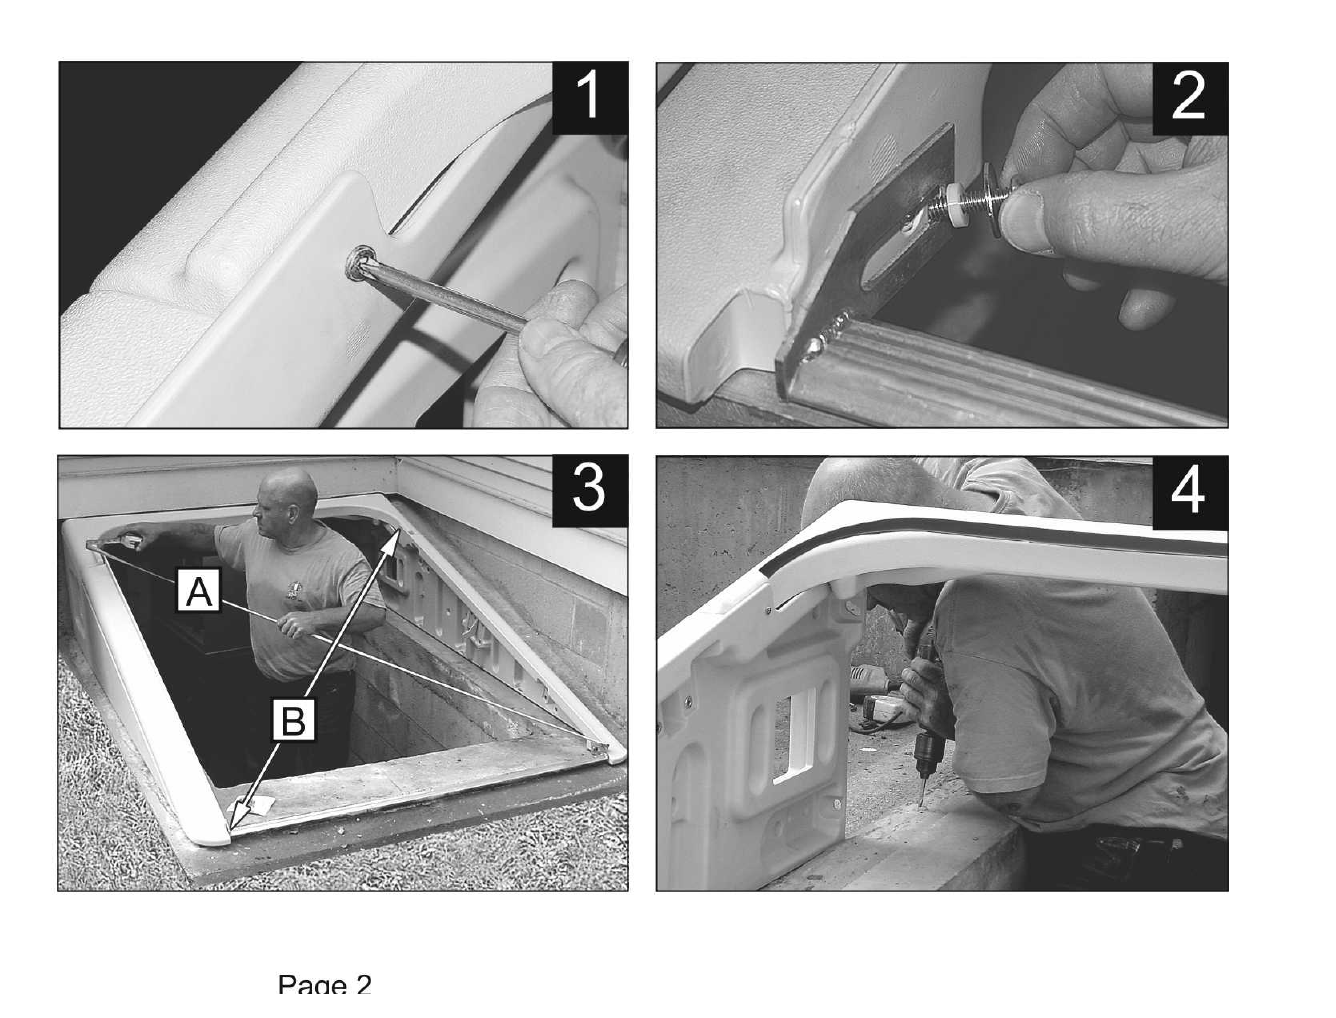
Plumb the sides and make diagonal measurements equal. The distance between side-piece anchor holes must be at least 53-1/4 inches on center. Drill, anchor and fasten the header as specified, then caulk the full exterior perimeter with opaque polyurethane.
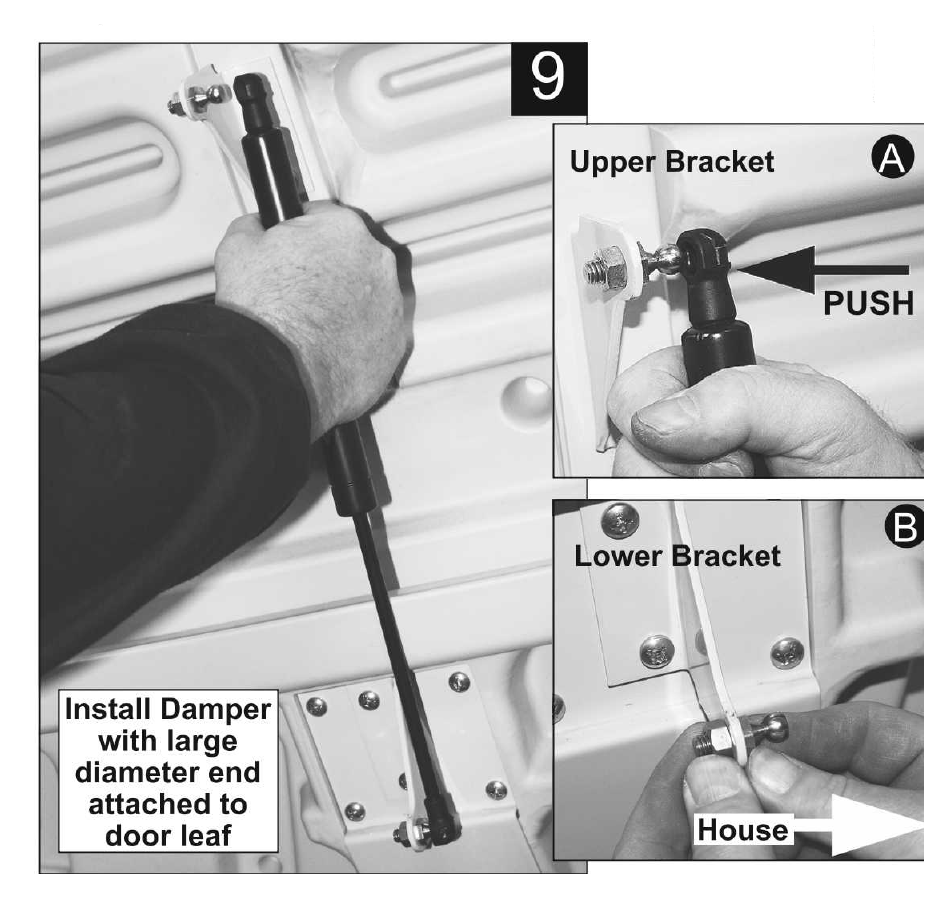
Fasten each closed leaf to its hinges in the manual’s order. Install ball studs facing the house and snap each motion damper onto the upper and lower studs.
Follow the separate directions for solid, vented or clear inserts. Do not paint Ultra. Clean with a non-abrasive household cleaner. Confirm aligned leaves, free drainage, continuous caulk and smooth movement.
Get the Details Right
Official BILCO Videos

See the overall sequence of a BILCO basement-door installation.
Watch on YouTube →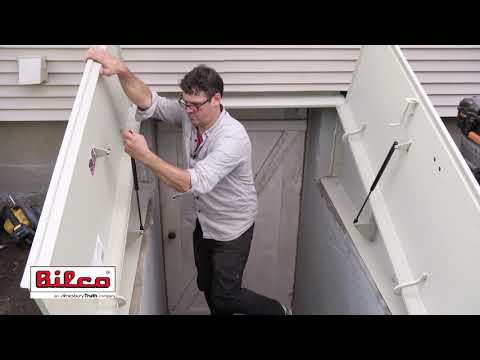
Watch a BILCO door installation using foundation plates to improve the areaway.
Watch on YouTube →In-Depth Installer Training
For a thorough step-by-step breakdown of installing a Classic Series basement door, watch BILCO's detailed installer-training video.
Watch the In-Depth Installation Video →Shop Basement Supply
Primed steel doors
Powder-coated doors
Primed Size C extensions
Powder-coated Size C extensions
Primed BR doors
Powder-coated BR doors
Primed BR extensions
Powder-coated BR extensions
Ultra polyethylene door
Ultra extensions
Primed foundation plates
Powder-coated foundation plates
Quick Answers
No. Remove the old door and measure W1, W2, L1, L2 and—on flat foundations—H1. Repairs and older construction can change the usable opening.
W1 is the clear inside opening. W2 is the full outside width across both walls. The frame must cover W1 while resting on enough sound foundation within W2.
Classic and Ultra fit flat foundations. Type BR fits two existing, sound sloped masonry sidewalls. Each system has separate hardware and instructions.
No. Classic C is 55 × 72 × 19-1/2 inches; Ultra is 56 × 73 × 19-1/2 inches. Their extensions and hardware are also different.
BILCO documents multiple Classic C and overlapping BR extensions when properly supported. Ultra permits no more than two. Never combine extension families.
They can cover rough surfaces and minor voids, not structural damage. Loose, unstable or crumbling masonry must be repaired or recapped.
Yes. Finish within 45 days using exterior alkyd-base enamel: one thin coat followed by a second coat on both exterior and interior primed surfaces.
No. BILCO states that the high-density polyethylene door cannot be painted.
No. Those accessories use separate instructions and are intentionally outside this guide. The Weather Strip Kit does not apply to Ultra.
Measure Twice. Order Once.
Send us your five measurements and photos before ordering. We can help identify the correct family, size, extension and foundation-plate setup.
{"one"=>"Select 2 or 3 items to compare", "other"=>"{{ count }} of 3 items selected"}